Kitchen Organization for Beginners: Where to Start
A plain starting point for a disorganized kitchen: what organizing really means, the five steps in the order that works, and a small first project to learn the method on.

A disorganized kitchen rarely has one big problem. It has dozens of small ones: a drawer that jams, a cabinet nobody wants to open, a counter that fills up again by Wednesday. Looking at all of it at once is what makes the job feel impossible.
Kitchen organization for beginners comes down to one idea and one order of work. The idea is that every item gets a fixed place that is easy to reach and easy to return to. The order is what keeps you from doing the same work twice. Both are laid out below, along with a small first project to try them on.
What organizing a kitchen really means
Organizing is deciding where each thing lives. That place is its home: the one spot where the item is always found and always returned. A kitchen feels organized when you can reach for something without thinking and put it away without rearranging anything else.
Notice what is missing from that description: matching containers, labels on everything, shelves that look styled. Those can help in specific spots, but they are tools, not the goal. A kitchen with plain shelves and no bins at all can work very well if the right things are in the right places.
Two tests tell you whether a home is a good one. Can you get the item with one motion, or two at most? And will a tired person at the end of the day actually put it back there? If either answer is no, the home needs to change.
The order that works
Most frustration comes from doing sensible steps in the wrong sequence. This order avoids that, and each step makes the next one easier.
- Clear out what is not used. Fewer things means less to store, less to move and more room for what remains. The step-by-step decluttering plan shows how to do this one area at a time while the kitchen stays in use.
- Group what is left by what you do with it. Baking tools together, food containers together, everything for making coffee together. Groups show you how much space each activity really needs.
- Give each group a home near where it is used. Pans near the stove, dish towels near the sink, everyday plates near the dishwasher or drying rack. This is the thinking behind organizing a kitchen by activity zones.
- Measure, then add organizers only where a home needs one. A divider, a shelf riser or a bin solves a particular problem in a particular spot. Buy it after you know the spot and its dimensions.
- Keep it going with a short reset. A few minutes of returning things to their homes, most days, is what holds the arrangement in place.
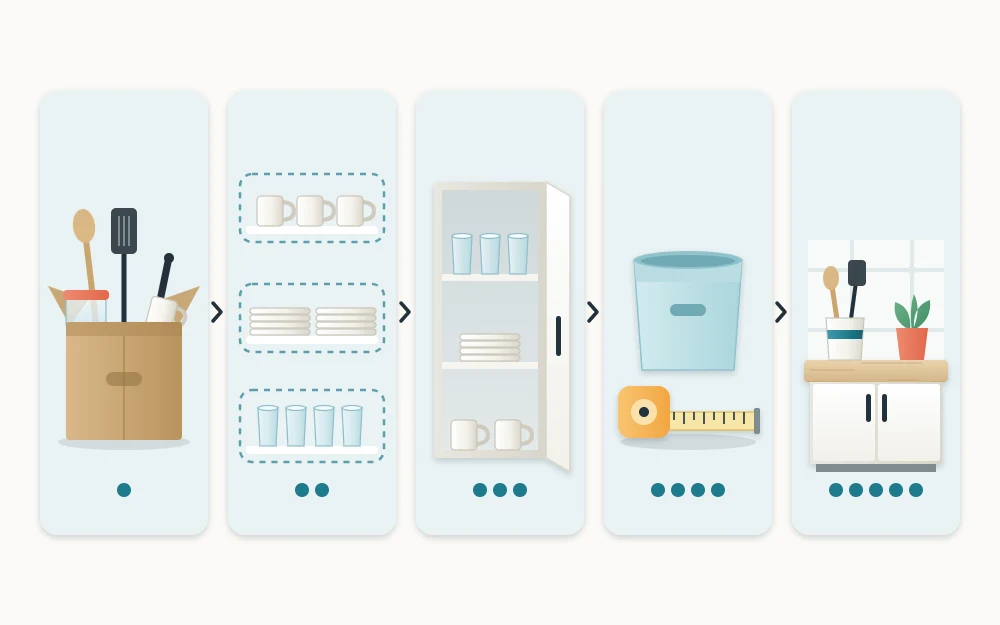
Why buying bins first usually backfires
Shopping for organizers feels like progress, which is why so many people start there. The trouble is that you are buying for a kitchen that does not exist yet. Until you have cleared out and grouped, you do not know how many items a bin needs to hold, which cabinet it will sit in, or whether that group needs a container at all.
The usual results are bins that do not fit the shelf depth, dividers sized for the wrong drawer, and containers that end up holding clutter you would otherwise have let go. Organizers also take up room themselves. A bin with thick walls in a narrow cabinet can leave you with less usable space than before.
Cabinets and drawers vary a lot between kitchens, so no product is certain to fit yours. Measure the inside width, depth and height of the exact spot, allow for hinges and door frames, and check the product’s listed dimensions before you buy.
Tip
Before buying anything, try a stand-in. A shoebox, a small cardboard box or a spare baking pan can act as a temporary bin for a week or two. If the arrangement works, you know the size to look for.
Start with one drawer or one cabinet
Emptying the whole kitchen onto the counters is the fastest way to give up by mid-afternoon. A small first project teaches the method with very little at stake. Pick a spot you use daily and that annoys you: the utensil drawer and the cabinet holding everyday dishes are both good candidates.
- Take everything out and set it on a clear surface.
- Remove what is broken, duplicated or never used.
- Sort what stays into groups of like items.
- Ask whether each group belongs in this spot or closer to where it is used.
- Put back only what belongs, with the most-used items at the front.
Allow roughly half an hour to an hour for a single drawer or shelf, depending on how full it is. Then use it for a week before changing anything else. You will learn more from living with one finished drawer than from planning the whole room on paper. When you are ready for something bigger, the guide to organizing kitchen cabinets applies the same steps shelf by shelf.
What organized looks like in a kitchen you cook in
A kitchen that is used every day will never look staged, and it does not need to. Dishes pile up during cooking. Mail lands on the counter. Someone puts the colander in the wrong cabinet. None of that means the system has failed.
A realistic standard is this: everything has a home, most things are in it most of the time, and getting the room back to its baseline takes minutes rather than an afternoon. If you can clear the counters and close every drawer in a short evening reset, the kitchen is organized.
It also helps to expect adjustments. Your first arrangement is a best guess. After two or three weeks you will notice the item you keep walking across the room for, or the shelf that is always a mess. Move things. Changing a home that is not working is part of the method, not a sign you got it wrong.
Where to go next
Once the first drawer is done, work outward in the same order. Declutter the rest of the kitchen area by area, then decide on zones, then deal with individual cabinets and drawers. Leave organizers until last.
If you have organized before and it did not last, it is worth reading about the common kitchen organization mistakes first. Most of them are steps taken out of order, and each has a simple fix.
Frequently asked questions
Where should I start when organizing a kitchen?
Start with one small, heavily used spot such as the utensil drawer or the cabinet with your everyday dishes. Empty it, remove what you do not use, group what is left and put back only what belongs there. A single finished drawer teaches the whole method before you commit to the rest of the room.
Do I need to buy organizers to organize a kitchen?
Not at the start, and sometimes not at all. Decide what stays and where it lives first. Then measure the exact shelf or drawer and add a divider, riser or bin only where it solves a specific problem. Many kitchens work well with very few organizers once items are in sensible places.
How long does it take to organize a whole kitchen?
It depends on the size of the kitchen and how much is in it. As a rough guide, a single drawer or shelf often takes under an hour, and a whole kitchen is usually easier spread over several short sessions across a couple of weeks than attempted in one long day.


